Hey, if you're a data hoarder like me, or are someone who just wishes to have a neat way to showcase your media, then this post might be of use to you. To begin with, I'll offer a concise explanation to the stack I'll be using.
- Jellyfin Jellyfin simply gives you a nice UI to browse your media in. You give it the path to your media library, which, keep in mind, has to be tidy, divided into subfolders with clear names of Movies, or TV Shows. Something like this
media
├── movies
│   ├── All Quiet on the Western Front (2022)
│   ├── AlphaGo (2017)
|   ├── (...)
│   ├── A Man Called Ove (2015)
│   └── Zack Snyder's Justice League (2021)
└── tv
    ├── 1883
    ├── Ancient Aliens
    ├── (...)
    ├── The Last Dance
    └── Yellowstone (2018)
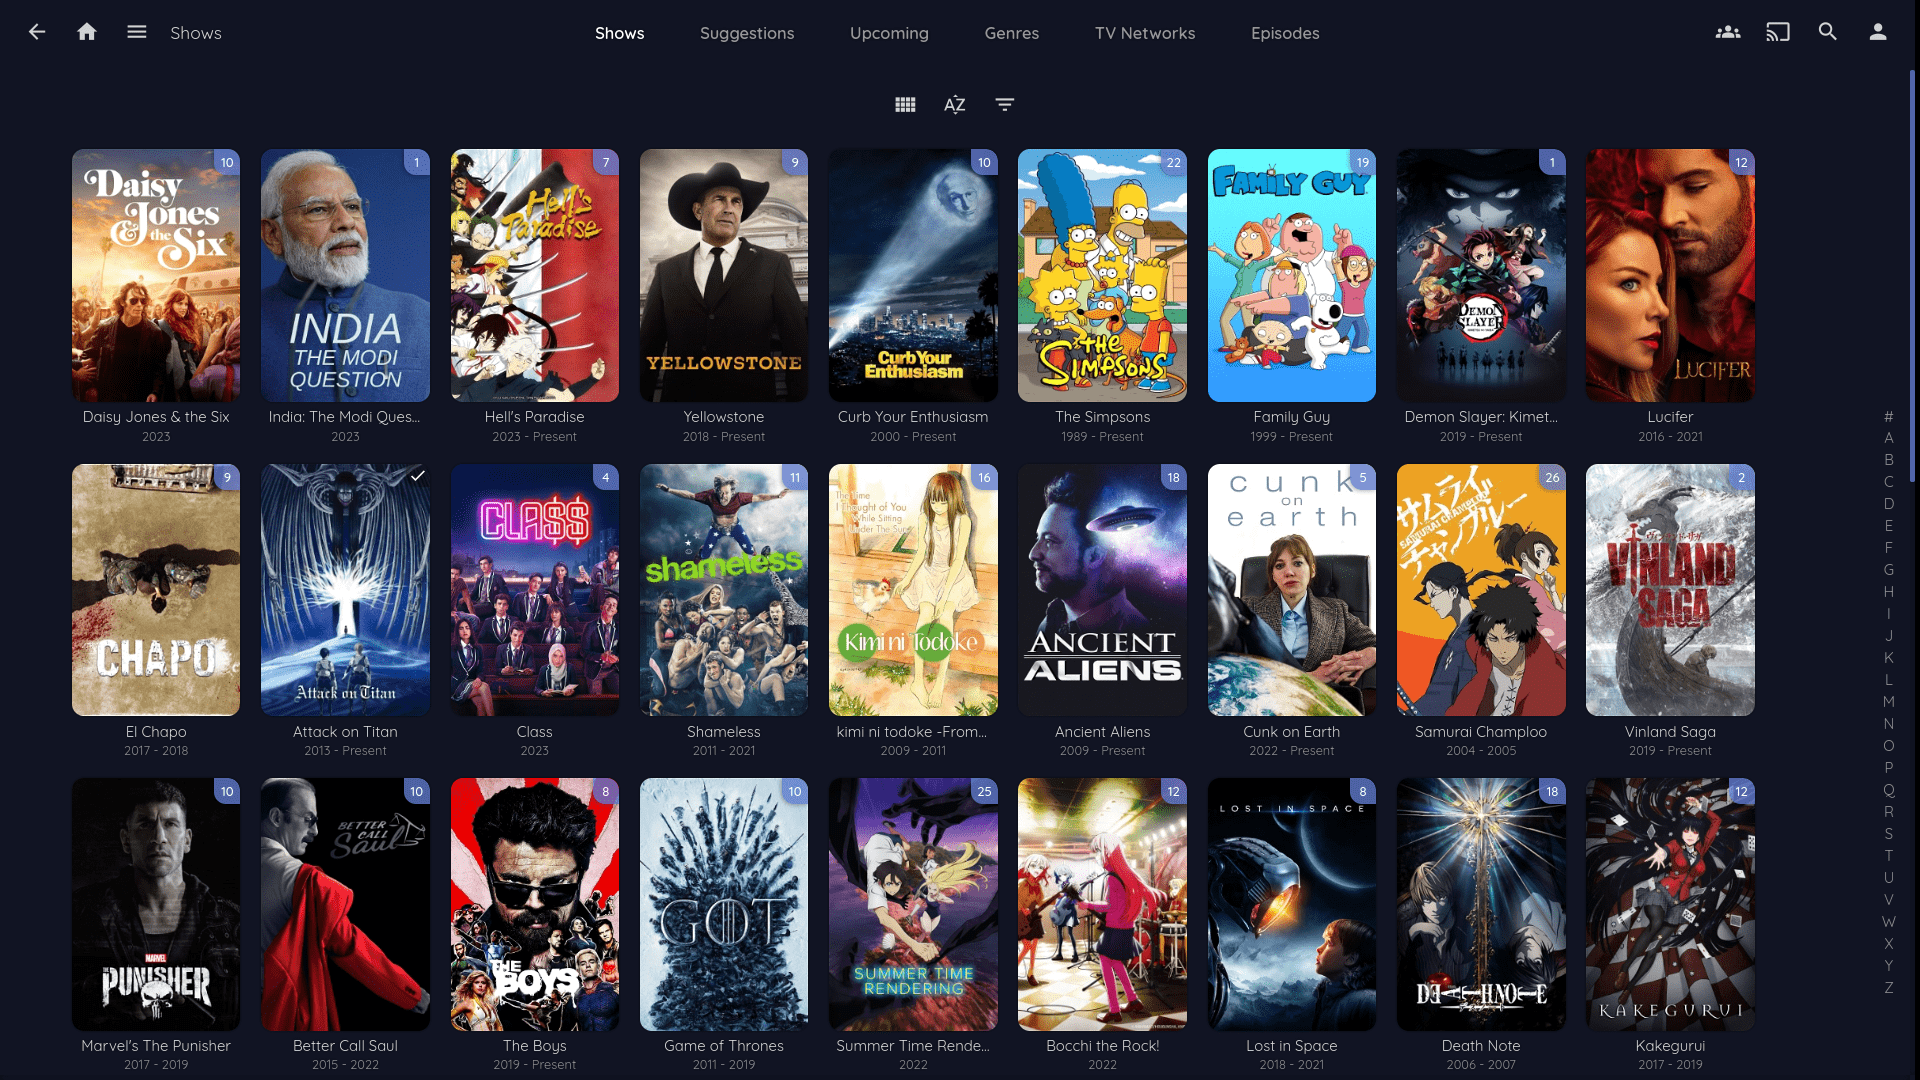
And after you're done, you'll have an interface that looks something like this

 * Sonarr
Manually arranging all these shows and movies into their respective folders with names and release years is a hassle, so Sonarr does this for us (only for shows). We let it communicate with our download client, and it grabs whatever our download client downloads and arranges it all neatly into our media folder (more on this later).
* Sonarr
Manually arranging all these shows and movies into their respective folders with names and release years is a hassle, so Sonarr does this for us (only for shows). We let it communicate with our download client, and it grabs whatever our download client downloads and arranges it all neatly into our media folder (more on this later).
-
Radarr Radarr does what Sonarr does, but for movies.
-
Bazarr To download subtitles for us.
-
qBittorrent Enhanced This is what downloads our content. Basically qBittorrent, but enhanced. The only reason I chose the enhanced version was because the normal version does not allow you to give it a link to a file on the internet which contains a list of trackers that the torrents should use. It allows you to add the trackers manually, but there's links like this which are updated everyday, so it's far easier to just give a link to qBittorrent Enhanced to pull the list on its own.
-
Flood qBittorrent's UI is horrendous. I mean, there's alternative UIs but none of which I've found compare to Flood. Flood basically gives you a nice interface to monitor all your torrent in the browser
Now that you're familiar with your tech stack, let's start.
Portainer
What is Portainer (Docker)
By far the simplest way to set up your media server is using Portainer, which is essentially a nice web GUI for Docker, and can be accessed from other machines too. Docker is a platform for running applications in lightweight, isolated containers, making it easier to deploy and manage software across different systems.
Installing Portainer
Since I'm running my server on a headless spare computer in my home, I don't need the GUI version of docker, I've installed the docker engine. Installing docker engine on ubuntu. Make sure you also install docker-compose. You might also want to look at this, so you don't need to be root to run docker commands. After you've got docker, installing Portainer is a no-brainer. After it's running, configure your admin user and password on https://\<host>:9443 (note the HTTPS).
Now, I have all my data on a 2TB external drive. I mount it on /mnt/2_TB_Hard_Disk, and all the data for our media server is stored in /mnt/2_TB_Hard_Disk/media_server. But I've symlinked ~/media_server to that location, and you can do the same (not sure about symlinks on Windows). For reference, this is my fstab entry for the drive
/dev/disk/by-uuid/A89E4BAF9E4B753A /mnt/2_TB_Hard_Disk auto nosuid,nodev,nofail,x-gvfs-show,x-gvfs-name=2_TB_Hard_Disk 0 0
So from now on, I refer to the root directory of the media server as ~/media_server.
Structure
Since our root folder probably differ, set the environment variable ROOT to be your root folder. Mine would then be set to /mnt/2_TB_Hard_Disk/media_server
This is what our folder structure looks like
$ROOT
├── config
│   ├── deluge
│   ├── jellyfin
│   ├── radarr
│   └── sonarr
├── media
│   ├── books
│   ├── movies
│   └── tv
└── torrents
    ├── complete
    ├── incomplete
    └── torrent_files
Create the directories with these commands, but make sure you've exported your ROOT variable, like export ROOT=/mnt/2_TB_Hard_Disk/media_server for me.
cd ${ROOT}
mkdir -p config media torrents
mkdir -p config/qbittorrent_enhanced config/jellyfin config/radarr config/sonarr
mkdir -p media/movies media/tv
mkdir -p torrents/complete torrents/incomplete torrents/torrent_files
Our config is stored in ${ROOT}/config. The torrents that our download client downloads are stored in ${ROOT}/torrents/complete, while they are incomplete, that is, still downloading, the will be stored in ${ROOT}/torrents/incomplete. The torrent files you upload to deluge are stored in ${ROOT}/torrents/torrent_files.
Adding our stack in Portainer
Creating a Stack
Docker Compose is an extension to docker for running your multi-container applications. It lets you write all the important details in a simple YAML file, like what containers you need, how they talk to each other, and what things they need to share. With Docker Compose, you can start, stop, and scale your containers with a single command. Docker Compose makes it pretty easy to control multiple containers at once, but Portainer makes it easier.
Head over to your Portainer dashboard, go to your local environment (at least, that's what it should be if you haven't changed up the settings), and go to Stacks>Add Stack. Name your stack whatever you want, I've named mine media_server.
Adding environment variables
We first add our environment variables. You can add each one of them individually, or create a file ending with .env and uploading it to the web interface.
This is how your environment file should look like, modify the time zone and root folder to whatever suits you. Upload it to the stack, there should be a button at the bottom of the page.
# Timezone, https://en.wikipedia.org/wiki/List_of_tz_database_time_zones
TZ=Asia/Kolkata
# UNIX PUID and PGID, find with: id $USER
PUID=1000
PGID=1000

# The directory where data and configuration will be stored.
ROOT=<your root folder in quotes>
Compose file
This is what specifies what images we use and their settings.
version: "3.2"
services:
  bazarr:
    image: linuxserver/bazarr:latest
    container_name: bazarr
    environment:
      - PUID=1000
      - PGID=1000
      - TZ=Etc/UTC
    volumes:
      - ${ROOT}/bazarr/config:/config
      - ${ROOT}/media/movies:/movies
      - ${ROOT}/media/tv:/tv
    ports:
      - 6767:6767
    restart: unless-stopped
    network_mode: host

  flood:
    image: jesec/flood:master
    container_name: flood
    ports:
      - 3000:3000
    restart: unless-stopped
    network_mode: host

  qbittorrent:
    image: p3terx/qbittorrent-enhanced:latest
    container_name: qbittorrent_enhanced
    environment:
      - PUID=1000
      - PGID=1000
      - TZ=${TZ}
      - QBT_WEBUI_PORT=7050
      - TORRENTING_PORT=6881 # Not sure if this has any effect
    volumes:
      - ${ROOT}:/data
      - ${ROOT}/config/qbittorrent_enhanced:/qBittorrent
    ports:
      - 7050:7050
      - 6881:6881
      - 6881:6881/udp
    restart: unless-stopped

  radarr:
    container_name: radarr
    image: linuxserver/radarr:latest
    restart: always
    logging:
      driver: json-file
    network_mode: host
    environment:
      - PUID=${PUID}
      - PGID=${PGID}
      - TZ=${TZ}
    volumes:
      - /etc/localtime:/etc/localtime:ro
      - ${ROOT}/config/radarr:/config
      - ${ROOT}:/data

  sonarr:
    container_name: sonarr
    image: linuxserver/sonarr:latest
    restart: always
    logging:
      driver: json-file
    network_mode: host
    environment:
      - PUID=${PUID}
      - PGID=${PGID}
      - TZ=${TZ}
    volumes:
      - /etc/localtime:/etc/localtime:ro
      - ${ROOT}/config/sonarr:/config
      - ${ROOT}:/data

  jellyfin:
    container_name: jellyfin
    image: linuxserver/jellyfin:latest
    restart: always
    network_mode: host
    environment:
      - PUID=${PUID}
      - PGID=${PGID}
      - TZ=${TZ}
    volumes:
      - ${ROOT}/config/jellyfin/db:/config
      - ${ROOT}/media:/data
      - /dev/shm/jellyfin:/transcode
Here's a brief explanation to what each section of this docker-compose.yml means
qbittorrent
Directly uses hosts network stack, always restarts, even on failure or system reboot, process UID and GUID as set in .env, uses root/config/qbittorrent_enhanced as its configuration folder.
The line - ${ROOT}:/data means, to deluge, /data points to our root folder. For example, /data/hello.txt would translate to the file /mnt/2_TB_Hard_Disk/media_server/hello.txt on my system. We'll use this while configuring Deluge.
Radarr, Sonarr
Pretty much the same
Jellyfin
Here, to Jellyfin, /data points to root/media. Be careful, this might be confusing, because in deluge, /data pointed to root.
while jellyfin is transcoding video when serving to users, it needs a directory to temporarily store files. Usually these files are not too big big in size, so I decided to store them in /dev/shm. The /dev/shm directory is a virtual filesystem that allows processes to share memory using temporary files. It stands for "shared memory" and is typically mounted as a RAM-based filesystem. Simply put, the files you put in it are stored in RAM, rather than persistent storage.
Deploying
Deploy your stack with the Deploy the stack button at the bottom. Portainer will now download all the required images; this will probably take some time.
Configuring our applications
qBittorrent Enhanced
Go to your compoter's IP address on port 7050. The default user and password are admin and adminadmin respectively. Also, I;m very aware that some of you will inevitably forget the password and panic. If you happen to find yourself in that situation, open your file explorer. Go to your ${ROOT}/config/qbittorrent_enhanced/config. Open the file qBittorrent.conf, and delete the line containing WebUI\Password_PBKDF2. This will reset the password to adminadmin, probably.
Firstly, change the default username and password in the WebUI section of the settings.
In Settings>Downloads, edit the options to look like this:
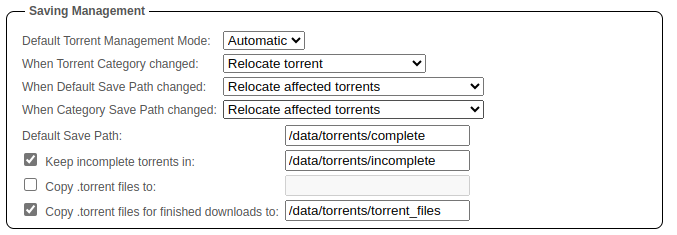
In Settings>BitTorrent, tick the "Automatically update public trackers list" option and add this URL to it. This will probably help you find seeders faster and increase download speeds. Note that we'll use the categories sonarr and radarr inside of qBittorrent for shows and movies respectively, this comes later.
Sonarr
Now open your browser on any machine, and go to you server's IP on port 8989, something like http://192.168.1.34:8989/.
Go to settings on the left column, and to Media Management.
Check the Rename Episodes box.
At the bottom, click on Add Root Folder, and add /data/media/tv. Remember, this points to ${ROOT}/media/tv, where our TV Shows are stored. Also, click on Advanced Settings and make sure "Use Hardlinks instead of Copy" under the "Importing" section is ticked. Click on saves changes at the top. Finally, it should look something like this
![[Pasted image 20230624152020.png]]
Now go to Download Clients > Add Client > qBittorrent.
Name it anything, I've simply named it qBittorrent. Set the host to localhost, and change the port to 7050(as we've specified in our compose file). Change the category to sonarr, and check Remove imported downloads from download client history (when finished seeding for torrents) at the bottom. Click on test, and if it shows a green tick, you're good to go. If not, make sure the deluge container is running and you've followed deluge's configuration correctly.
Radarr
Go to your server's IP address on port 7878.
Go to Settings > Media Management. Check the Rename Movies box and add a root folder from the bottom with the path /data/media/movies. Save Changes.
Add qBittorrent to the download clients exactly like you did with Sonarr, make sure its category is radarr
Bazarr
Go to your server's IP address on port 6767.
Go to Settings > Languages. Make the settings look like this: (if you're looking for English subtitles, that is. If not, the changes are pretty insignificant, you can figure that out yourselves)
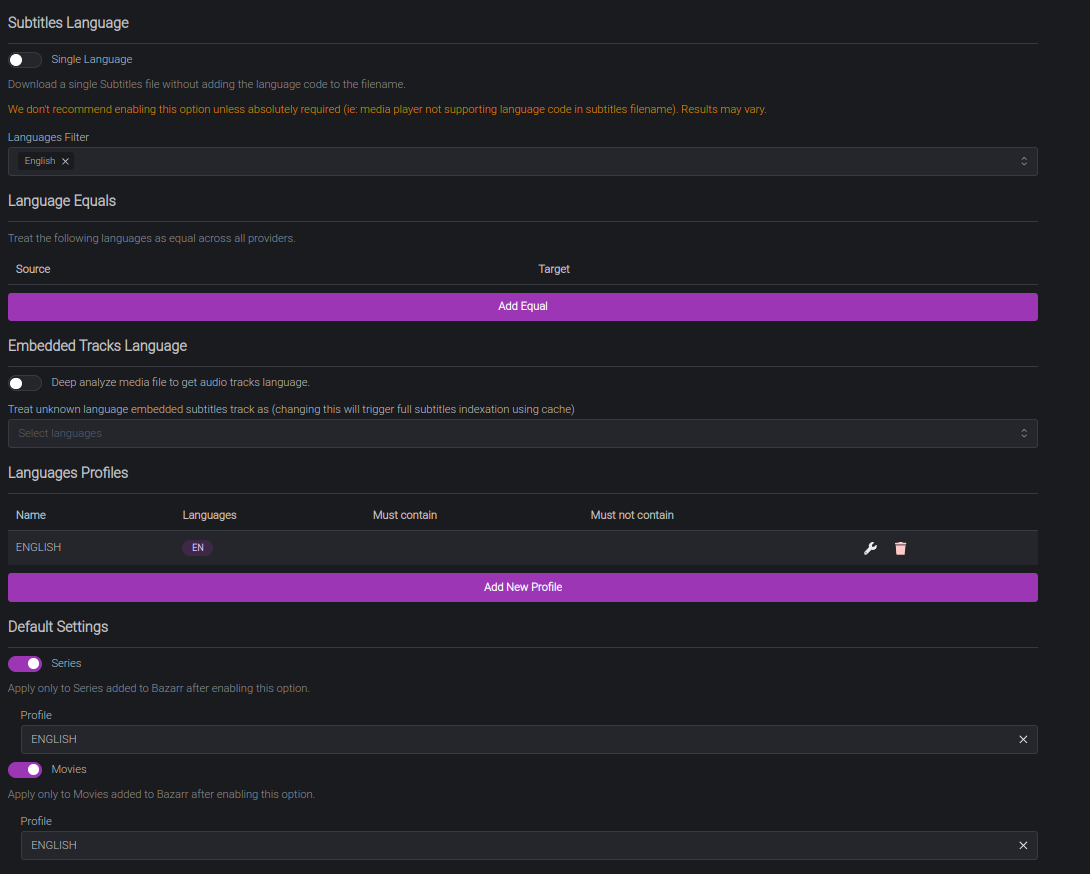 Go to Settings > Providers
This is where Bazarr gets subtitles from. After a bit of fiddling, I've settled on a group of providers which has been working fine for me mostly. They are:
OpenSubtitles.com, subf2m.co, TVSubtitles, OpenSubtitles.org, Gestdown, YIFY.
Some of these require an account, so make one where necessary.
Go to Settings > Providers
This is where Bazarr gets subtitles from. After a bit of fiddling, I've settled on a group of providers which has been working fine for me mostly. They are:
OpenSubtitles.com, subf2m.co, TVSubtitles, OpenSubtitles.org, Gestdown, YIFY.
Some of these require an account, so make one where necessary.
(Optional) Go to Settings > Subtitles
If your subtitles aren't perfectly synced to the audio sometimes, this might help you. In the "Synchronisation / Alignment" section, tick "Automatic Subtitles Synchronisation". I believe this uses ffsubsync to synchronise the downloaded subtitles to the audio. I've tried using this, but this isn't always accurate. So I keep this setting off.
Go to Settings > Sonarr
Set the address as localhost. You can get your API key from Sonarr's web UI, in Settings > General.
At the bottom of the page, make a path mapping from /data/media/tv to /tv
Go to Settings > Radarr
Set the address as localhost. You can get your API key from Radarr's web UI, in Settings > General.
At the bottom of the page, make a path mapping from /data/media/movies to /movies
You can change the settings in Settings > Scheduler as you like.
Jellyfin
Go to your computer's IP on port 8096.
Se your username and password, and click on Add Library. Set the Content Type to Movies, and the path to /data/movies
Add another media library with Content Type as Shows and path as /data/tv. Also tick the Automatically merge series that are spread across multiple folders box.
Continue setup.
Flood
This should be straightforward, just go to your computer's IP address on port 3000, create an account and set the URL for your qBittorrent instance as http://localhost:7050, and the user and password as whatever you chose before.
You're done!
Now, to add movies and shows.
Go to any torrent site, I'd personally recommend watchsomuch. You can download the .torrent file, or you can copy the magnet link and then add it to qBittorrent's UI. Make sure to set the category as appropriate (sonarr for shoes, radarr for movies). However, this is just too tedious. I made a small script to help me with this.
First, head over to qbt on Github, download the latest release, and put the binary somewhere in your path (~/.local/bin for me). qbt let's you add torrents to your qBittorrent instance from the terminal. Create .qbt.toml in ~/.config/qbt, and paste this into it:
addr       = "http://YOURIP:7050" # qbittorrent webui-api hostname/ip
login      = "YOURUSER"                  # qbittorrent webui-api user (optional)
password   = "YOURPASSWORD"              # qbittorrent webui-api password (optional)
Change the settings as needed, here is when you'd probably benefit by assigning a static IP to your computer from your router, it's pretty simple to do, just Google it. Or if you're running the media server on the same machine from which you think you'll be adding torrents, just put localhost.
Create another file, preferably named more creatively than qbit_upload_from_clipboard, and paste this into it:
#!/bin/bash

# Check if the number of arguments is not equal to 1
if [ "$#" -ne 1 ]; then
    echo "Usage: $0 <category>"
    echo "r: radarr, s: sonarr"
    exit 1
fi

category=""

if [ "$1" == "s" ]; then
    category="sonarr"
elif [ "$1" == "r" ]; then
    category="radarr"
else
    echo "Invalid category. Exiting."
    exit 1
fi

# Check if xclip is installed
if ! command -v xclip &> /dev/null; then
    echo "xclip is not installed. Please install it using 'sudo apt install xclip' (for Ubuntu) or the equivalent command for your distribution."
    exit 1
fi

# Capture clipboard content
clipboard=$(xclip -selection clipboard -o)


# Check if clipboard content is a magnet link
if [[ $clipboard == magnet:* ]]; then

    qbt torrent add ${clipboard} --category ${category}

    echo "Torrent file created successfully."
else
    echo "Clipboard does not contain a valid magnet link."
fi
Give it execution permissions with chmod +x qbit_upload_from_clipboard, and put it somewhere in path.
Now, when I want to add a movie, I copy it's magnet URL, and in the terminal, I run:
qbit_upload_from_clipboard r
It grabs the link from my clipboard, and adds the torrent to qBittorrent.
To add something to Sonarr, copy it's magnet URL, and run:
qbit_upload_from_clipboard s
Works like magic
Whenever you add something to Radarr/Sonarr to qBittorrent, you have to add the same thing on Radarr/Sonarr's UI as well. For example, when you add a movie, open Radarr, and go to "Add Movie". Search the movie's name, and add it, without changing any of the settings that it shows. The same with Sonarr, although you won't have to do it for each individual episode.
Hopefully, after some time, the movie shows up in Jellyfin, but you might have to re-scan your movies' library by right click > scan for new metadata.
End Notes
I hope this blog post provided you with at least some useful information. Please leave a comment down below to let me know. If you find any mistakes, please reach out to me at agastya.singh@live.com Thank you for reading.